


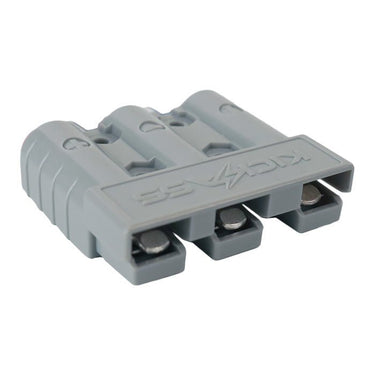


KickAss 3 Pin 50A Grey Anderson Style Connector
Pickup available at Acacia Ridge Store
Usually ready in 1 hour
1 Year Warranty
This product is covered by a 1 Year Limited Warranty.
Run your positive alternator, negative ground & ignition wires together in a single, durable connector. Fully insulated, rated to 50amps and made from strong polycarbonate.
SPECIFICATIONS
Technical Details
| Contact Rating | 50A |
| Contact Wire Size | 6 AWG |
| Voltage Rating | 600V (AC or DC) |
| Max Wire Insulation Diameter | 11mm |
| Contact Barrel Wire Size (AWG) | 6/10/12 AWG |
| Contact Retention Force | 22.7kg |
| Operating Temperature | -20°C to 105°C |
User Manual & Support Docs
| KickAss 3 Pin 50A Grey Anderson Style Connector |
Detailed Description
The new KickAss Three-Pin Anderson Style Connector simplifies connecting your DC-DC charger by allowing you to run your positive alternator, negative ground, and ignition wires in a single connector. It’s fully insulated, rated to 50 amps, and made from durable polycarbonate. The single-piece housing offers a cost-effective, safe, and long-lasting connection.
Includes:
- 4 Anderson terminals
- 3 terminals for 6 AWG wire
- 1 terminal for 10/12 AWG wire
Please Note:
Grey Anderson plugs are only interconnectable with Black and Grey Anderson plugs.
Installation Instructions
PLEASE ENSURE YOU UNDERSTAND THE INSTRUCTIONS PRIOR TO FITTING.
- Carefully strip back the cable sheathing using a stripping tool or Stanley knife (for twin-core cable).
- Strip 1 cm of insulation from each single-core cable (positive and negative) using a stripping tool.
- Attach the Anderson connector terminal lugs to the stripped cable ends and crimp them securely using a crimping tool.
- Confirm the terminal lugs are properly crimped by ensuring they cannot be pulled off.
- With the terminal lug lip facing up, insert the positive and negative cables into their designated slots on the Anderson plug (+ and -).
- Push cables through until the terminal lug lip latches over the internal spring clip and clicks into place.
- Verify each cable is secured by pulling gently—each should stay locked in place.
Note: To remove the cables from the Anderson plug once installed, use a small flathead screwdriver to press down the spring clip while pulling the cable out from the back of the plug.


