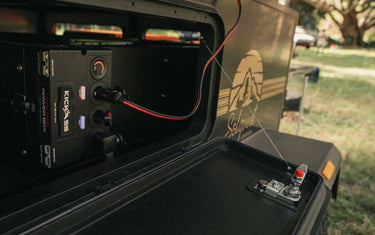
Setting up your 12v mini control box can transform your off-grid experience, providing a reliable, centralised hub to power all your devices. With the ability to charge multiple gadgets simultaneously and connect to various power sources, it’s the ultimate addition to any camping, caravanning, or 4WD setup. Here’s a step-by-step guide to installing your control box to get you up and running.
Step 1: Choose Your Mounting Location
First, decide where you want to install the control box. The KickAss 12V Mini Control Box offers multiple mounting options, allowing you to set it up in the most convenient spot for your setup. Popular locations include the rear of your vehicle, inside a canopy, or near your camping area for easy access. Ensure the spot is dry, secure, and within reach of your devices and power sources.
Step 2: Secure the Control Box
Once you’ve chosen the ideal location, secure the mini control box using the appropriate mounting hardware. Depending on your setup, you can use screws, brackets, or even Velcro strips to hold the unit in place. The box is designed with anti-slip rubber feet, which help keep it stable on various surfaces. Make sure it’s firmly fixed to avoid any movement during transit.
Step 3: Connect to Your Power Source
Next, connect the control box to your primary power source. The KickAss Control Box can be charged from a variety of sources, including your vehicle’s batteries, solar panels, or other 12v systems. Use the Anderson-style input for quick and secure connections to solar or other charging systems. Ensure all connections are tight and that cables are routed neatly to prevent tangling or wear.
Step 4: Plug In Your Devices
With the control box powered up, you can now start plugging in your devices. The unit features six USB ports, three 12V cigarette sockets, and two Anderson-style output ports, allowing you to charge and run up to 11 devices simultaneously. Whether it’s powering your fridge, charging phones, or running lights, the KickAss Control Box makes it easy to distribute your 12v power.
Step 5: Monitor Power Usage
One of the standout features of the Control Box is its multi-colour LED volt meter, which provides a clear visual indicator of your battery’s charge status. Keep an eye on the volt meter to ensure you’re not overusing your battery and that your power input is keeping up with demand. This feature is especially useful when running on solar panels.
Step 6: Use the Built-In LED Light
The control box comes equipped with a built-in 3-stage led light, perfect for lighting up your campsite or working area. The light can be easily switched on and off and adjusted to suit your needs, adding an extra layer of functionality to your setup.
Step 7: Protect Your Ports
Finally, use the protective USB cover to shield your ports from dust and grime. This simple but effective feature helps maintain the longevity of your control box, ensuring reliable performance over time.
By following these steps, you can easily install your Control Box and start enjoying the convenience and reliability of centralised power management for your off-grid adventures. Ready to take control? Get your KickAss 12V Mini Control Box set up today! If you have any trouble, drop into one of our retail stores, or give us a ring on 07 3123 1415 – our team of 12V experts will be happy to help.


